
I love working from home. I get to be with my cats, my wife, and my things. At my desk I have an electric tea kettle, my own chosen peripherals, and a KVM switch to operate my work and home computers using the same peripherals that switch between systems at the press of a button. It’s convenient for my wife and I to be able to talk to each other during the day when decisions need to be made about household tasks or expenses. As much as I love her and being around her, sometimes my wife’s timing on these quick discussions isn’t the best. Too often in my time working from home, she’s come into my office to ask me something and I’ve had to shoo her away because I’m in a meeting. She’ll feel bad for interrupting, and I’ll feel bad for dismissing her with a hand gesture because I don’t have time for her at the moment but can’t communicate that verbally.
The nature of my work is that often at any moment, I’ll be pulled into a call for an emergency or high priority item, schedule be damned. Between the priority of a call, my responsibility to my employer, and my nature of being easily distracted, I needed to find a way to indicate that my attention was reserved 100% towards work and any non-emergency outside of that would have to wait.
How it started
Recently I found an article by Hans Scharler on building an On Air light that followed your webcam on/off state, turning the light on when the camera was on. Hans’ article is well written and documented, making it an easy to follow guide to make an inexpensive and practical tool for those in my exact situation. It was exactly the tool I needed and I shared the article with others who worked from home.
As useful as the guide Hans authored is, I had some security and technical limitations that would prevent me from using his methods. From a functional perspective, tracking the webcam state wouldn’t be viable because we rarely use our cameras on calls. From a security perspective, no way would I be able to justify using an unapproved cloud service to track anything my company-owned system was doing. The idea of building an On Air light was firmly in my head by this time, so I pursued alternative options that would fit my requirements.
Tracking Teams Presence
The recommended method to track Teams presence is through the Microsoft Graph API. A simple web request made every few seconds by a script would reveal what the current state was, specifically if I was available or in a call/meeting. Enter the security hurdle of trying to justify being granted additional permissions in our Azure tenant for a personal project. This would certainly not be an effective use of my work time.
Teams writes all kinds of data to %appdata%\Microsoft\Teams\logs.txt while it’s running. The most important of that data was when the presence changed, and what it changed to. My personal preference is to use local data over cloud data when possible, as the light could update much faster and wouldn’t stop working in the event of an API outage or failed authentication. If coded correctly, the only thing that would prevent the light from working as expected would be if Teams itself weren’t working, rendering the light moot anyway.
The Controller
Hans uses an ESP32 Arduino controller in his project, which is a great option for about $11. I have an Arduino Uno that’s been sitting in a drawer for close to a decade, so I opted to use that instead. Fortunately, Arduino devices for a simple on/off light are pretty much interchangeable, but your use case may require network connectivity. My method does not, and here’s where I begin to deviate from Hans’ guide. His method has the controller making its own web requests, and my method has the controller toggling a light based on a local log file.
I opted to use PowerShell to monitor the log file and update the controller based on conditions in the logs. “But Python is better!” Yes, I agree, but PowerShell is native to my work computer because it only runs Windows. Natively controlling an Arduino through PowerShell isn’t easy, but fortunately, someone else has authored a tool for exactly this purpose. Enter Solid.Arduino, a .NET library from author SolidSoils that can be used with PowerShell to control an Arduino device without having to do a lot of tedious trial and error. To use Solid.Arduino, I had to install the Arduino IDE (this can be done on any system, doesn’t have to be the system controlling the light) and switch the “sketch” (the code the controller runs) to Firmata. The steps to do this are provided in the linked GitHub repo. Now, the real work can begin.
It’s Coding Time!
add-type -path c:\windows\system32\Solid.Arduino.dll

$light = $false
$SerialPorts = Get-CimInstance -Class Win32_SerialPort | Select-Object Name, Description, DeviceID
$ArduinoPort = $SerialPorts | where-object -property Description -eq 'Arduino Uno' | Select -ExpandProperty DeviceID
$connection = New-Object Solid.Arduino.SerialConnection($ArduinoPort,[Solid.Arduino.SerialBaudRate]::Bps_57600)
$session = New-Object  Solid.Arduino.ArduinoSession($connection,2000)

Start-Sleep -Seconds 1

do {
    $statusmsg = get-content %appdata%\microsoft\teams\logs.txt -Tail 100 | Select-String -Pattern 'StatusIndicatorStateService: Added '
    $status = ($statusmsg -split "\(" -split "StatusIndicatorStateService: Added ")[-2]

    switch ($status)
    {
        "Busy " { $light = $true
            $laststatus = $status }
        "InAMeeting " { $light = $true
            $laststatus = $status }
        "OnThePhone " { $light = $true
            $laststatus = $status }
        "Available " { $light = $false
            $laststatus = $status }
        "DoNotDisturb " { $light = $true
            $laststatus = $status }
        "Presenting " { $light = $true
            $laststatus = $status }
        "NewActivity " { $light = $light
            $status = $laststatus }
    }

    $session.SetDigitalPin(13,$light)
    #write-host $status $light
    sleep 2
}

while (1 -gt 0)
Let’s break this down from top to bottom:
Add-Type is used to import the Solid.Arduino library that we need to communicate with the controller more easily.
$light = $false is how we set the default state of the light to Off.
$SerialPorts gets a list of all the USB devices connected to the system. $ArduinoPort selects my Uno controller from the list of USB devices. $connection connects to the controller using Solid.Arduino, and $session uses the connection to create a session object that we can call to send instructions.
Start-Sleep waits for one second for the connection to establish and the session to be created before calling the next part, our main logic loop.
The “do” loop (with “while” at the end of the script) says what code to execute until a close condition. In this instance, the code is told never to stop. Yes it’s a dirty practice, but it works and I threw this together in a morning.
$statusmsg is how we read the log file, with -tail 100 selecting the last 100 lines and Select-String getting the specific text we’re looking for.
$status is just parsing the text in $statusmsg to pick out the individual piece we care about from the message, the presence.
A switch statement is a more concise way of doing multiple if/then statements. If $status equals any of the values below it, we set the light state to true or false (on or off), then record the previous status/presence. The previous value is necessary for the “NewActivity” presence, which means there’s an unread message or notification and it throws everything else off. In retrospect, it may be something that can be removed.
After the switch block, we call SetDigitalPin from the $session object to set pin 13 on the controller to be on or off based on what we want the light to do.
Write-Host is a line that’s commented out for debugging purposes, as it will otherwise fill the window with the values of the presence state and the light state.
Lastly, we wait 2 seconds before checking and updating again.
At last, let there be light
Finally, pictures and not the braggadocios ramblings of Steve!

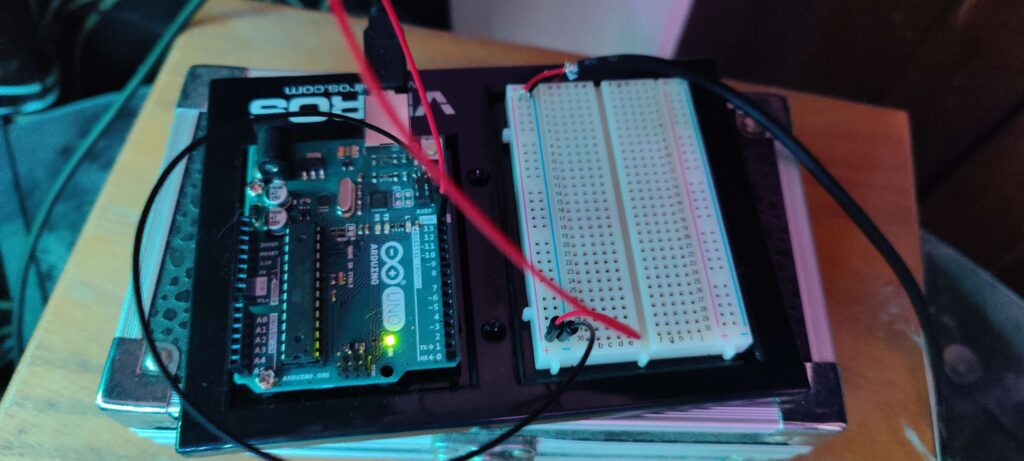
Here’s the light I bought for $15 from Amazon. It uses 4 surface mount LEDs on a strip, has an independent power switch, and is powered entirely by USB. I lucked out by selecting this light, because the pins on the Arduino could each provide sufficient power for the whole strip, so I didn’t have to do any math or figure out any issues with insufficient amperage. It also meant I didn’t have to disassemble the light, but I did that anyway for fun. As an added bonus, I now have sufficient justification to get a multi-meter for future projects.
I used pre-pinned cables that were included with my Uno kit to wire the pin I was controlling and the ground to the provided breadboard. I grabbed an old USB cable that was long enough to place the light where I wanted and cut off the A end (that matches the ports on a computer or charger) then plugged the red and black wires from the cable into the breadboard with their corresponding color. It’s not as pretty a solution as what Hans provides, but I have the opportunity to replace the light with a different device and have the same functionality. Maybe I want a USB powered rotating police light or something down the road. Whatever device I want to use, I can just swap the cable and hope there’s sufficient amperage to power it. If there isn’t, I get to learn more about electronics.
While I’d like to post a video of the light in action, it requires recording my screen which would reveal company information that I shouldn’t. Also, it just turns on and off. It’s not that exciting but I promise it works.
Reinventing the Wheel
After showing this project to a coworker who works in the office, he was excited to create the same effect for his cubicle to let his teammates know when it was okay to approach his desk to initiate a conversation. He found this on Amazon, which does the same thing using better software, has more features like flashing on incoming calls, multiple light colors for different presence states, and costs about the same as the combined cost of all the components I’m using. He now has the better status light, but mine comes with the smug satisfaction that I made mine myself.
[…] rybelsus sale […]
[…] purchase clomid online […]
[…] 5 mg cialis […]
[…] buying cialis online safely […]
[…] 100mg sildenafil tablets […]
[…] cheap viagra 50mg […]
[…] ginseng for fatigue in men […]
[…] sildenafil 25 mg price walmart […]
[…] best price for viagra 100mg […]
[…] how to get cialis online […]
[…] cialis 5mg price comparison […]
[…] cialis online […]